

Choose a compact pouch for essential roadside tools, a roll bag for a portable kit with clearer tool organization, and a metal tool chest for a broad workshop assortment. The right format depends on tool count, mobility, protection, presentation, freight and the way the end user works.
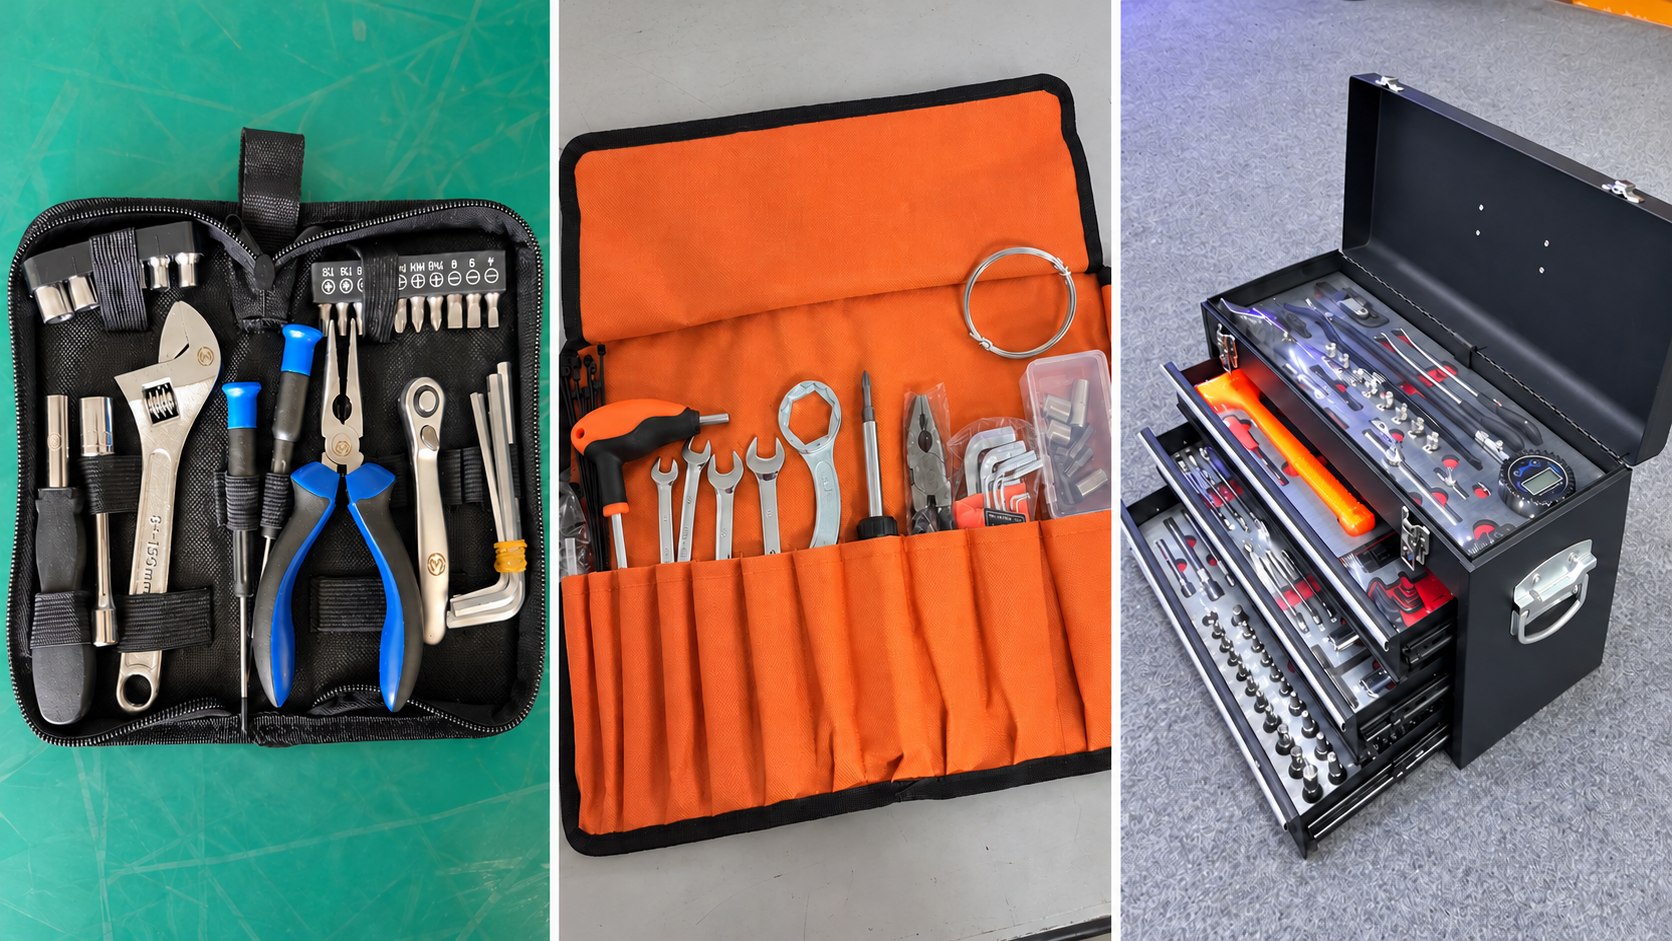
A motorcycle tool kit is more than a list of sockets and wrenches. The storage format shapes how quickly users can find a tool, how well the contents travel, how the set is presented at retail and how practical it is to replenish or customize.
This guide compares three common formats for buyers planning a wholesale or private-label program: compact zip pouches, textile roll bags and multi-drawer metal tool chests. It also explains what to specify before requesting a sample or quotation.
Compact pouch: Small footprint for essential roadside maintenance and emergency tasks.
Roll bag: Portable textile storage with individual pockets and flexible kit layouts.
Tool chest: High-capacity workshop storage with dedicated trays and drawers.
Motorcycle tool kit format comparison
| Factor | Compact pouch | Roll bag | Metal tool chest |
|---|---|---|---|
| Typical use | Roadside essentials | Mobile service or owner maintenance | Workshop and comprehensive service |
| Portability | Highest | High | Low |
| Tool capacity | Low | Medium | Highest |
| Organization | Elastic loops and small pockets | Individual stitched pockets | Dedicated trays and drawers |
| Protection | Basic soft-case protection | Soft-case protection with separation | Rigid enclosure and fitted storage |
| Branding options | Printed or sewn label, zipper pull, insert | Color, piping, print or patch, insert | Badge, label, color, tray and outer carton |
| Freight profile | Lowest volume and weight | Moderate | Highest volume and weight |
The table is a selection guide rather than a fixed specification. A kit can be configured with more or fewer tools, and the same application may suit different formats in different sales channels.
1. Compact tool pouches: the essentials in the smallest space
A zip pouch works well when portability is the first priority. It can hold a focused selection such as combination pliers, an adjustable wrench, a ratchet, sockets, screwdrivers, hex keys and interchangeable bits. Elastic loops help keep the tools visible when the case is opened.
This format is a practical choice for motorcycle owners, touring riders, vehicle accessory programs and promotional kits. It is also easier to pack inside a motorcycle, top box or luggage system than a rigid case.
Points to specify
- Closed dimensions, total weight and intended storage location.
- Tool retention method and whether tools remain secure during transport.
- Zipper, stitching, handle and fabric requirements.
- Exact socket, bit, wrench and hex-key sizes for the target market.
- Brand label, instruction card and retail packaging.
2. Roll-bag kits: portable, visible and easy to configure
A tool roll offers more layout flexibility than a compact pouch. Individual pockets can separate wrenches, drivers, pliers and specialty tools, while the textile body folds or rolls into a portable package. When opened, the full set is easy to scan and individual tools are easier to return to their positions.
Roll bags suit mobile mechanics, end users who do more maintenance themselves and brands that want a distinctive color or textile presentation. They can also support market-specific tool combinations without requiring a rigid molded tray for every configuration.
The tradeoff is that the layout must be tested with the actual tools. Pocket width, depth and stitching position affect retention. Sharp edges should not press directly against fabric during transport, and the closure should remain secure when the kit is fully loaded.
3. Metal tool chests: maximum range and workshop presentation
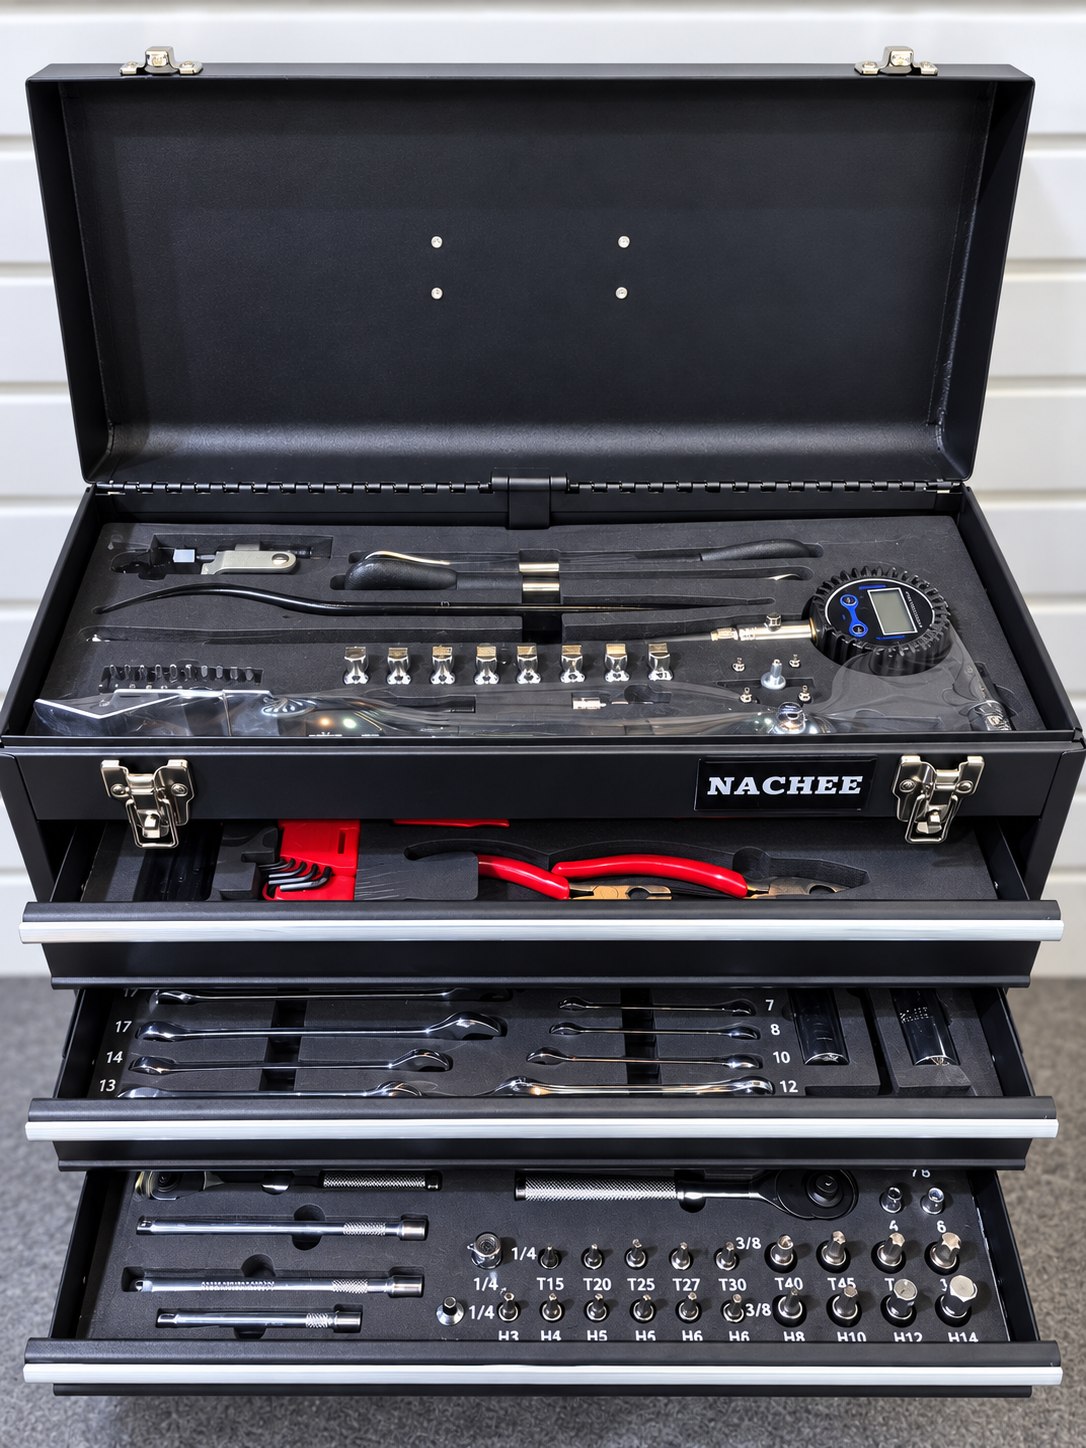
A metal chest is designed for a larger collection and a fixed or semi-fixed working environment. Separate drawers and fitted trays can organize sockets, drive tools, wrenches, pliers, measuring tools and motorcycle-specific service items in one system.
For distributors and workshop suppliers, a chest creates a strong presentation and makes inventory gaps easier to spot. The rigid enclosure also gives tools better physical protection than a textile bag. In return, the buyer must account for greater product weight, carton size and shipping cost.
Points to specify
- Chest material, finish, drawer construction, handle and latches.
- Tray material, fit and resistance to movement during transport.
- Tool layout by drawer and a complete, size-by-size contents list.
- Gross weight, master-carton protection and drop or transport requirements.
- Replacement-tool and replenishment plan for long-term workshop use.
How to choose the right format for your market
Start with the end user’s work rather than the case style. A useful brief should explain where the kit will be stored, which maintenance jobs it should cover and whether the buyer values maximum portability, broader capability or workshop organization.
- Define the jobs.
List the repair and maintenance tasks the kit must support. - Control the contents.
Specify every tool, size, drive and adapter instead of relying on piece count. - Set the duty level.
Clarify occasional roadside use, regular owner maintenance or professional workshop use. - Plan the sales channel.
Consider retail shelf presentation, e-commerce shipping and wholesale cartons. - Compare total landed cost.
Include packaging volume, gross weight and transport—not only the unit price. - Keep room for replenishment.
Confirm how missing, worn or damaged tools can be replaced.
OEM and private-label decisions
Storage is one of the most visible parts of a private-label tool kit. It should be specified alongside the tools, not added at the end of the project. Depending on order quantity and project scope, customization can include:
- Case color, piping, fabric, metal finish or outer-carton design.
- Printed logo, woven patch, rubber badge, metal badge or product label.
- Tool markings, color accents and selected handle styles.
- Market-specific tool contents and size combinations.
- Instruction sheets, barcode labels, warning labels and retail inserts.
- Custom tray or pocket layouts for an approved contents list.
Custom branding is usually simpler than changing the complete product structure. A new tray, pocket layout or tool combination may require additional sampling, tooling or minimum quantities. Send the target market, expected volume, artwork and required launch timing with the first inquiry so feasibility can be evaluated early.
Sample approval and assembly checks
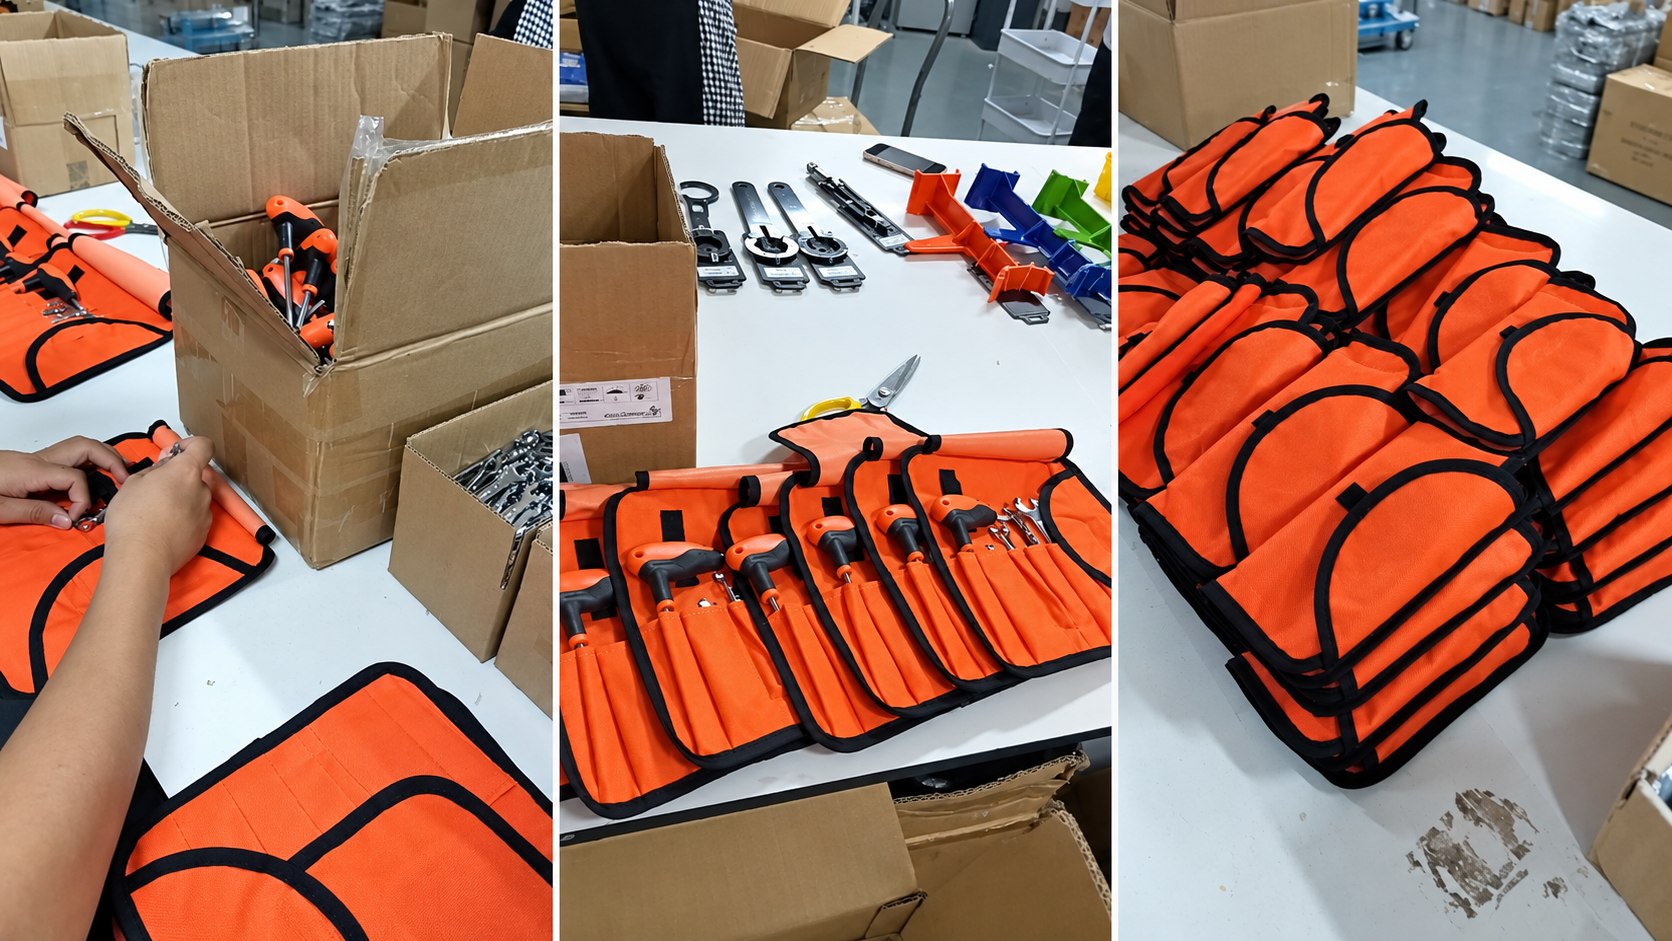
A sample should confirm the complete system: tools, storage, markings and packaging. For a textile kit, open and close the fully loaded bag repeatedly and check the stitching, pockets, zipper or straps. For a chest, inspect drawer movement, latches, handles, tray fit and protection inside the shipping carton.
Before production, approve a contents list with size, quantity and position for every tool. During packing, this makes it easier to verify that the correct components are present and placed consistently. For branded projects, the approved reference should also cover artwork position, color, labels and carton marks.
A practical approval sequence
- Confirm the application, target user and required maintenance tasks.
- Review the proposed tool list and remove duplicate or low-value pieces.
- Select the pouch, roll or chest format and approve its dimensions.
- Test a complete sample for tool fit, access, retention and transport.
- Approve branding, inserts, labels and carton details in writing.
- Use the approved sample and contents list as the production reference.
If you are still comparing potential partners, see our guide on how to choose a motorcycle repair tool supplier in China.
Frequently asked questions
Which motorcycle tool kit format is best for roadside use?
A compact zip pouch is usually the most practical because it uses the least storage space and keeps essential tools together. The exact contents should match the motorcycle and the repairs a rider can safely perform away from a workshop.
When should I choose a roll bag instead of a hard case?
Choose a roll bag when portability and flexible organization matter more than rigid protection. It is useful for mobile service, owner maintenance and kits that need a configurable pocket layout.
Can motorcycle tool kits be customized for private-label orders?
Yes. Common options include the contents list, case color, logos, labels, instruction sheets and retail packaging. Custom tray or pocket layouts may require additional sampling, tooling and minimum quantities.
What information is needed for a tool kit quotation?
Provide the target user and market, required maintenance tasks, preferred storage format, tool list or reference set, expected quantity, branding, packaging requirements and delivery schedule.
Planning a motorcycle tool kit program?
Send NACHEE your target market, preferred format, tool list, estimated quantity and branding requirements. We can review a standard, private-label or custom kit approach for your project.